Homemade Raspberry Pi Case

pi case by itself raspberry pi model b

So a while back I was thinking of making a new case for my Raspberry Pi and now I’ve finally gotten around to finishing one!

Items I used:

  • White cardboard box that my RPi Model B came in, so it was already sized to shape
  • 1/4 ” thick anti-static foam salvaged from the hard drive section of an old computer tower
  • Four rubber end caps from a Meccano Erector set to use as rubber feet for the case
  • Silver spray paint
  • Red spray paint
Parts used to make the case.

This was a make-it-up-as-you-go kind of project for me. I first cut all the peripheral holes one at a time, starting with the USB and Ethernet ports. Then I cut the foam to size and cut a big ventilation hole in the bottom of the case directly underneath the Broadcom chip.

The artistic part came next. I spray-painted the entire case silver to give it a metallic look and used black paint and a crumpled paper towel to give it a sponged, scratched-up look around the sides. I also added the visage of the Raspberry Pi logo using red spray paint and a 3D printed template of the logo. It didn’t come out too good maybe because I jiggled it a bit during spray-painting and didn’t block it properly. It goes with the sturdy-used-tech theme of the case I think though.

 The bottom of the case, with the big ventilation hole and the rubber feet.
The bottom of the case, with the big ventilation hole and the rubber feet.

The last step was adding the rubber feet and putting it into action! The only problem I noticed is that it does get a little warm in the case. I probably should’ve added more ventilation holes in the bottom since the anti-static foam traps the heat. This isn’t really an issue for me, though, because I don’t run my Pi for very long periods of time.

raspberry pi case in action model b
The case in action.

Two Possible Pi Cases

my two pi case ideas

I’ve contemplated making a different case for my Raspberry Pi Model B and I’ve come up with two different ideas.

Case Option #1: A Heavily Decorated Cardboard Case

pi in cardboard caseI still have the cardboard box that my current Model B plastic case came in, and I could use the pre-sized cardboard box to make a simple dust case for my Pi. I would just have to cut some holes in the box for the peripherals, and maybe add some foam padding on the inside bottom. The fun part would be embellishing the outside of the case with glitter and unicorn stickers. (okay, I would NEVER put unicorn stickers on a Pi EVER, that would be a crime) I could add some kind of cool artwork with circuit symbols on it.

Of course, it would be an amazing pun to buy a mini raspberry pie to use the box it comes in as a Pi case, but, alas, I’ve never seen one in the store.

Case Option #2: Re-purposed Portable Cassette/Radio Player Case

cassette radio player
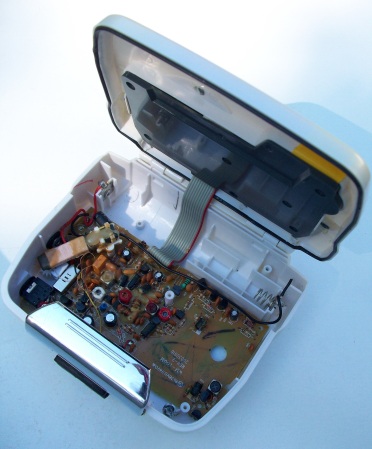
My other case idea is using to put the Pi in an old AM/FM radio and cassette player that I found. The cassette function never worked on it, so I took it apart, to discover that the Pi fit quite nicely in it. The radio function still works, and I haven’t decided if I should leave it for an extra function to the case, or remove to leave more room for the Pi. It does fit on top of the radio circuit quite nicely, but I would have to add some kind of insulator to seperate the radio circuit from the Pi and I would only be able to run the Pi headless because there’s not enough space to attach any peripherals.

I could remove the radio circuit completely or building my own smaller radio, but I’m probably better off using the Pi as an internet radio.There would be plenty of room to also add a Liion battery and turn it into a completely wireless case for the Pi to run it headless.

pi inside radio player

I’ll be working on one of these soon and I’ll post a image of what I end up doing!

Drawer Open/Close LED Sensor with Raspberry Pi

After discovering how to run the Pi headless without an internet connection, I made a simple sensor to detect if one of my bureau drawers is opened or closed. Basically, an LED turns on if the drawer is closed, and turns off when the drawer is opened.

View the code here. I used a Model B Pi.

I wired the drawer like a pull-up resistor button setup, and made contacts with Meccano Erector set pieces and lots of electrical tape. I added an LED, and then wrote some Python 3 code to run headless on the Pi. The picture below shows the Model B Pi with the LED.

Drawer Log

This picture shows the contacts on the drawer. There’s thin piece of metal on the drawer, and the two contacts are connected to the red and black wires. When the drawer closes, the contacts both touch the metal strip, and the circuit becomes continuous.

side view of drawer wiring

Instructions For Running Headless on the Pi Without Wifi

Running headless mean having your Raspberry Pi run a program without having it hooked up to a monitor, keyboard, or mouse. Basically you just need to edit a certain system file called rc.local.

  1. Login to your Pi. Open up a terminal.
  2. Type cd /etc to change the current working directory (in Linux lingo, cd means ‘change directory’).
  3. To edit the rc.local text file, type sudo nano rc.local. Navigate to the end of the file.
  4. Right before the exit0 line, add the line python3 /home/pi/code.py & where ‘/home/pi/code.py’ is the absolute location of the file you want to run, and the ampersand (&) means that you want to run the program in the background and let the Pi’s boot process continue. Note that you don’t need to add sudo because rc.local runs as root.
  5. The program will now run whenever you power the Pi, regardless if there is any peripherals attached. If you want to test it out, type sudo reboot in the terminal.
  6. Now you can showcase computing projects with your Pi without a monitor!